Implementing AzureAD SSO for the Kaseya VSA
In this post we cover how to setup Azure Active Directory to provide the authentication for a Kaseya Virtual System Administrator server using single sign on through SAML.
These instructions assume you have access to a Kaseya VSA server (with the AuthAnvil module installed) and licensed for Enterprise Applications in Azure AD.
We will not be covering the details of the Enterprise App configuration outside of the SAML based setup.
Configuration – Azure AD
- To begin log into your Azure AD tenant and open the Enterprise Applications settings.
- Choose New Application at the top.
- Then select “Non-Gallery Application” and give this a name.
- In the left menu choose Single sign-on
- Choose SAML as the option
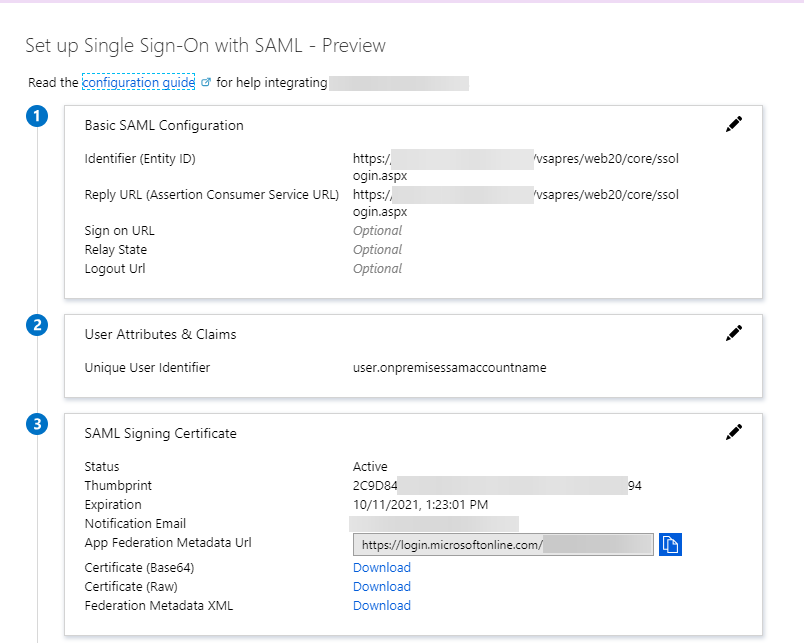
- Enter the Basic SAML Configuration section
- Identifier (Entity ID) for this we want to use the URL of your VSA server as a base and the rest of <vsaserver>/vsapres/web20/core/ssologin.aspx
e.g:
https://vsa.arweth.com/vsapres/web20/core/ssologin.aspx - Repeat this for the Reply URL (Assertion Consumer Service URL)
- Leave the remainder empty (Sign on URL, Relay State, Logout URL)
- Identifier (Entity ID) for this we want to use the URL of your VSA server as a base and the rest of <vsaserver>/vsapres/web20/core/ssologin.aspx
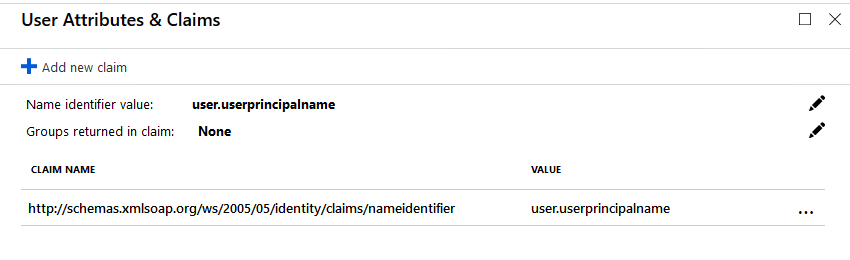
- Enter the User Attributes & Claims
- Name identifier value: This is what we use for the Kaseya user name.
- You want to delete all other entries from this section other than the one we use to sign into Kaseya with.
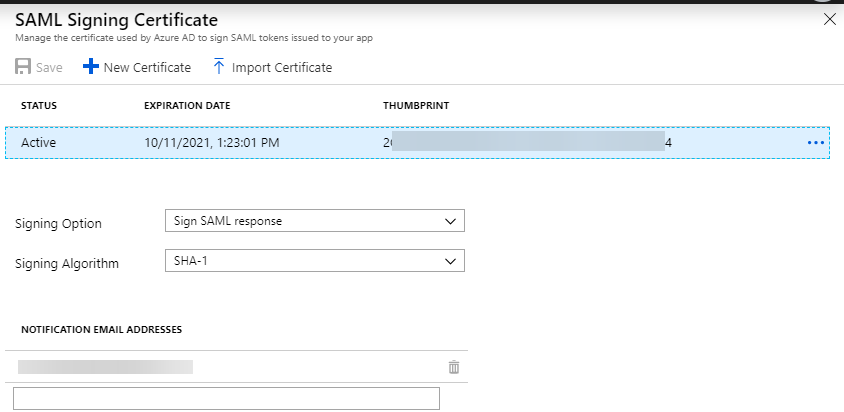
- SAML Signing Certificate
- Enter the configuration for the certificate. You can use the default Azure generated one or upload a new one if you use your own certificate on different platforms.
- Set the signing option to Sign SAML response
- Signing Algorithm to SHA-1
- Set a notification email address to be notified when this certificate is due to expire.
- Download the certificate (Base 64) as we need this later.
Configuration – Kaseya VSA
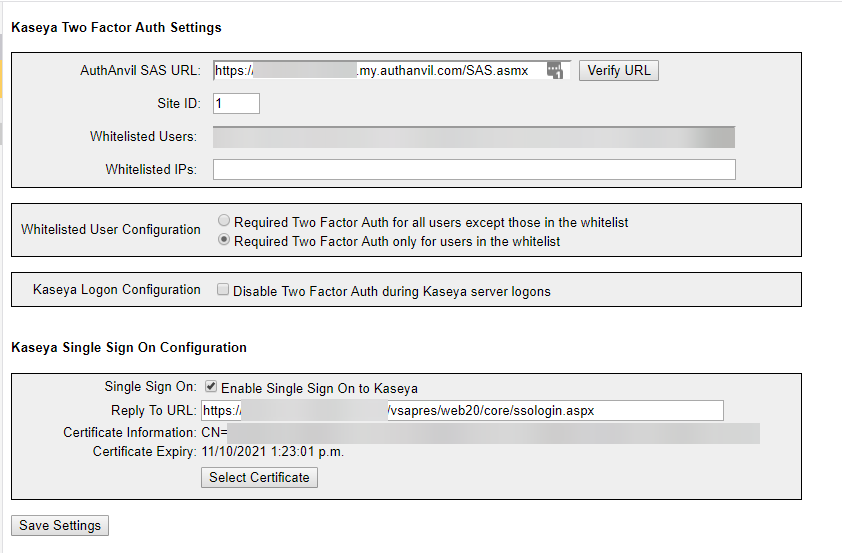
- From here we configure the AuthAnvil module in the VSA server.
- Go to AuthAnvil -> Two Factor Auth -> Configured Kaseya Logon
- Enter an AuthAnvil SAS URL just so this setting saves – we use a non-existing AuthAnvil on demand tenant as this still verifies the URL exists.
https://nonexistant-disable.my.authanvil.com/SAS.asmx - Tick the option “Enable Single Sign On to Kaseya”
- Set the reply to URL to the same as used in step 5.1 above
- Click “Select Certificate”
- Followed by “Choose File” and choose the certificate we downloaded in step 7.5 above
- Click “Import Selected Certificate” and confirm the certificate information supplied is for the correct certificate – if you used an Azure generated one this will have Azure details on it.
- Save the settings
Once you assign the application to users in AzureAD you should be able to log into the VSA with the enterprise application portal.
Troubleshooting
When this fails to work the sign in process will take you to the server login screen.
There are very few logs that assist with troubleshooting this.
One of the tools used when troubleshooting our configuration was the SAML-tracer plugin for Firefox: https://addons.mozilla.org/en-US/firefox/addon/saml-tracer/
This plugin when shows the SAML traffic and the data being passed to the Kaseya VSA server.
One of the main issues we encountered was getting the correct user claim passed in the SAML response.
This is because the user must match the internal Kaseya directory exactly.
The other main issue is to ensure your signing settings are correct as the VSA will not process these when set incorrectly.
Please comment here or reach out to me if I’ve missed something or a step is not clear.
Since VSA patch 17, there apparently has been some security hardening done. Has anyone found a way around it?
Hi guys,
We also use the UPN, but we want to work with guest-accounts in our Azure-tenant also (so which have another extension than our UPN’s within the Azure-tenant). What should we change you think?
Thanks!
Kind regards,
Glenn
Just worked for me with the SaaS version only downside is i cannot login the fusion app, but rarely used it anyway
Hi guys,
I’ve followed all the above settings and tested through the Azure portal so very happy that it’s working.
BUT, when we go to our usual login url (…./login.aspx) we still need to enter details and if we go to the sso url (…/ssologin.aspx) it redirects to the …/login.aspx page.
Any ideas?
Hi Helmut,
I don’t believe we ever had this in place as the system does not support it natively. So you would need access to the Kaseya application / web server.
You options would be to locate and modify the login.aspx page and include a redirect or meta refresh entry there but this would need to be done after every update.
The other option is to do this within IIS.
I can’t provide anything more specific to help here unfortunately but hopefully it helps.
I am seeing the same issue. Obviously we wouldnt have access to that on the SAAS version of VSA. I am guessing this isn’t an option then?
Yes unfortunately for the redirection you will need to be self hosted and not using the SAAS.
Kaseya has not made this process easy as they tried to sell their own products rather than provide integration with different providers.
Hello. We also use a cloud based VSA server and I was able to get the logins to work by changing the Unique User Identifier to “user.primaryauthoritativeemail” as we use the email addresses as user names. All other settings are the same as the document above. Other values for the claim may have worked but so far this has worked for us. I hope this helps others. Even Kaseya support only directs people to this doc.
Arweth,
Before I give this a try do you know, does this still work after all the changes they made after the hack?
Hi Jeff,
I no longer have access to a VSA instance however the organization I set this up for is still using this.
I do believe there was an issue with the AuthAnvil module in one of the updates since the hack however this may have been fixed already.
Cheers,
Arweth
Hi guys,
We tried they exact same setup as described above, but unfortunately when we use the ssologin.aspx page, we are redirected to the default logon page and nothing happens. Has somebody an idea? Thanks!
Hey Glenn,
Just wanted to make sure you are using ssologin.aspx – the article incorrectly had ssologon.aspx listed previously.
There are a few reasons the system could dump you at the login page. If the username being passed dosnt match the user name in VSA or if the attribute signing methods aren’t correct are the main two.
Hey Arweth!
Thanks for your quick answer! Yes, we saw the issue with the typo, but then we got a “Whoops, this page cannot be found”. We also used, like in the screenshots, user.userprincipalname (in the VSA users are listed like “domainname\username”), so I guess that’s correct? Or do we have to use (like in your 2nd screenshot user.onpremisessamaccountname?
Hey Glenn,
During the roll out I was involved in we changed all the VSA usernames to be the email address which is the UPN in Azure.
I believe the on onpremisessamaccountname is just the Pre200 value you see in AD and misses the DOMAIN/ portion of the format.
You may be able to get that using a transformation however you may also need to change the format of your usernames.
Cheers,
Arweth
Hey Arweth!
Thank you very much for the information! About the usernames: we use a discovery with a probe on a Domain Controller to interrogate the AD and it’s indeed Domain\username as username in the VSA. I think, if we have to change the username to email (as the Azure UPN) then we need to change every new username (which has been added as a VSA User) everytime to his/her email I guess, is that right?
Thanks a lot!
Regards,
Glenn
Yep that would be correct (Apologies for the delayed response to this one) – the previous instance I was involved with the users were managed independently of the VSA so at the time of migration everything was renamed to the email format.
An alternative is you script the change as a daily job to renamed the account however I don’t know how that plays with the discovery module.
Alright, great! Thanks for your information and help on this! We’ll change the users from domain/username to UPN format so it can authanticate with Azure AD. Thanks!
In the configuration part up top, you have ssologon.aspx but in the screenshots you have ssologin.aspx. The former doesn’t work.
Hey Alex, Thanks for the heads up. I’ve corrected this in the post now. Cheers
I just tried setting this up but I get redirected to the AuthAnvil Login page now
I have set up this as per the instructions. However, when I click the link to sign in, I get redirected to the following:
https://vsa.xxxxx.com/Error…
Has the workaround been patched? It would appear that the endpoint of “/vsapres/web20/core/ssologon.aspx” is invalid?
Let me know if you have any suggestions please.
As far as I know nothing has changed with the workaround and it’s still in place at my previous employment.
I no longer have access to a Kaseya instance any more to test this unfortunately as my current employer does not run it.
I’m happy to see if I can spot whats wrong if you want to share the configuration you are using in Azure and the Authanvil module (obscuring any relevant / personal information).
You can contact me directly at [email protected]
Hey Arweth,
we are using email address to login to VSA, may I know what should be the attribute on the Azure end for this configuration to work. Right now when we click the Kaseya VSA app, it is taking me to the VSA login page, but automatic login is not working. I believe there is something that needs to be done on the user attribute part.
Please correct the URL, it looks like you have entered ssologon.aspx instead of ssologin.aspx
I’ve been beating my head all morning on this one. Got everything setup per your article, but when I’m redirected to my VSA I just get ‘Oops. Something went wrong’. Verified SAML is passing correct username to match what’s in VSA. Not really sure what else to check.
I must have had a typo in one of the server addresses that I didn’t catch on the numerous times I looked them over. Working now. Thanks!
Thanks for this!! I got it working per your article. However, it is signing in with the local VSA user account. Do you know how to make it single sign into the domain account instead?
Unfortunately I’ve only done this on VSA’s using local accounts in the database.
Do you know how the usernames are formatted in the system for the domain? Do they use the same as local accounts or slightly different?
I saw the post on the Kaseya forums so would also suggest trying what you thought and rename/delete the local account if it matches what Azure is passing as well.
Once AD sync is enabled, then VSA adds a third, optional, field at login prompting for domain. You can either use this field to enter the domain or you can put the domain in the username using “<domain>\<username>” I believe it will accept the short NETBIOS domain or FQDN. So knowing this, do you think there a way to get AzureAD to match it up?
Hi
If you add another static attribute called domain and define the value as your domain that should do it. That is what aaod does.